Installing Oracle database 11g Enterprise Edition in linux- Pre-selected configuration
Steps to install automatic /default Oracle database
1.
Type command ./runInstaller
from the terminal under the database folder
2.
The installer will be checking for the system requirements
3.
Next step is to provide an option to get security updates from Oracle
using your OTN credentials.
i.
Check the option if updates are required.
ii.
Uncheck the security updates check box if no updates required from
Oracle
4.
Confirm to proceed with the next step
5.
Next step is to select the way you need to install and configure the
database
·
Create and configure a
database
(if you want to create and configure database by installer itself)
·
Install database software
only (if
you want to install only the software and configure database later)
·
Upgrade an existing
database
(if you want to upgrade already existing lower version database )
Now we are going to choose Create and configure a database.
6.
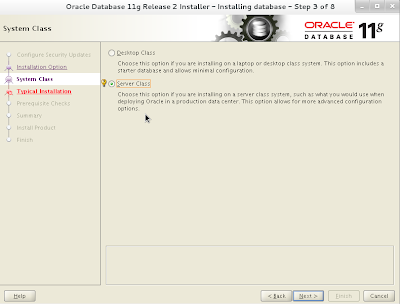
Next step is to select which type of system we are going to install
database software
·
Desktop class
·
Server Class
i.
Desktop Class:
Now we are going to see
database installation in Desktop class.
So, select Desktop class option in the installer window.
a.
Now check and provide the details for the following
Oracle_base :< ORACLE_BASE
location in our case it is /u01/app/oracle>
Software location :< ORACLE_HOME location in our case
it is ORACLE_BASE/product/11.2.0/dbhome_2>
Database file
location :<where you want to
place all the database files like data files , control files and redo files>
Database edition :< Enterprise Edition, Standard
Edition, Standard Edition One Choose accordingly as per the usage>
Character Set : <Choose from the
drop down according to your need>
OSDBA Group : <Select the DBA
group from the drop down Default: DBA>
Global database name : <Enter the database name >
Administrative
password :< Enter the
administrative password used by sys and system users/schemas>
Confirm password :< Enter the administrative
password once again>
b.
It is recommended to use Oracle Standards for the administrative
password due to security reasons. We will get an error if the password does not
satisfy the oracle standards.
c.
Now the installer will check the configuration requirements
d.
Save the summary of the configuration so that it would help later to
check the location of database files, dba group etc.
e.
Database installation in progress…
f.
While installing the software we could get the following error
Error in invoking target 'agent
nmhs' of makefile
Now for this don’t close
the installer but open a terminal window and follow the below steps
Please follow the steps to
solve the problem:
Open terminal window
Command :
cd /u01/app/oracle/product/11.2.0/dbhome_2/sysman/lib
or
cd $ORACLE_HOME/sysman/lib
ls ins_emagent.mk
vi ins_emagent.mk
Search for the line
$(MK_EMAGENT_NMECTL)
Change it to:
$(MK_EMAGENT_NMECTL) -lnnz11
Save the file.
Now click retry button from the installer popup.
g.
After successful installation the database will be configured
automatically.
h.
At the end of installation and configuration we need to unlock the
sample users and admin users through password management.
Now click Password Management button to unlock
the users.
i.
Now uncheck the tick mark to unlock the users and type oracle
recommended passwords in New password and Confirm password columns.
Click OK to save and exit.
j.
If the provided passwords are not of Oracle standards the configurer
will throw a warning.
Click yes if to proceed
with already provided passwords
Click No if to change the
passwords
k.
After successful configuration of database we need to run root.sh script which will set the
environment variables like ORACLE_HOME, ORACLE_OWNER etc. and make entries to
oratab file.
Don’t close the popup
window instead open a terminal window and run the script.
Open terminal
Cd /u01/app/oracle/product/11.2.0/dbhome_2
./root.sh
After running the script
click OK from the configuration
assistant popup.
l.
After this step the installer will configure the enterprise manager
also.
ii.
Server Class:
Now steps to install and
configure a database using server class option
A.
After step 5 we need to select the Server class option from the
displayed options.
B.
Click Single instance database
installation from the options displayed as we are not going to install
database software in Real Application Clusters.
C.
Now we got two options
1.
Typical install which will install
database software with minimal configuration
2.
Advanced install –for custom based
installation
Typical installation:
·
Click Typical Install from
the options displayed
·
In the next page supply the details like
A.
Oracle base
:<ORACLE_BASE location in our case it is /u01/app/oracle>
B.
Software location :<ORACLE_HOME location in our case it
is ORACLE_BASE/product/11.2.0/dbhome_2>
C.
Database file location
:<where you want to place all the database files like data files ,
control files and redo files>
D.
Database edition
:<Enterprise Edition, Standard
Edition, Standard Edition One Choose accordingly as per the usage>
E.
Character Set
: <Choose from the drop down according to your need>
F.
OSDBA Group
: <Select the DBA group from the drop down Default :DBA>
G.
Global database name :
<Enter the database name >
H.
Administrative password
:<Enter the administrative password used by sys and system
users/schemas>
I.
Confirm password
:<Enter the administrative password once again>
·
Provide oracle recommended password for security reasons
A warning popup will appear for using Oracle recommended passwords
Proceed with next steps if needed to use same password by clicking yes
Proceed with changing the password by clicking No
·
The installer will check for the system requirements
·
After requirements check, if required save the response file.
·
Click Finish
After Finish the installer will install the database software ,
configure a listener , configure a database ,
configure enterprise manager
which is explained in step Installation process.
Advanced Install:
·
Click Typical Install from the
options displayed
·
Choose the language
·
Now choose the database edition needed to be installed (as told
earlier we are going to see the steps to install Enterprise Edition database)
·
Now choose the ORACLE_BASE and ORACLE_HOME paths by using BROWSE
button to choose from file system or just provide the path in the fields.If the
path specified is not found installer will create it.
·
Now select the type of database needed to be installed
Ø Select General Purpose / Transaction processing
·
Specify the Global Database name and SID
·
Now allocate the memory for running database server
Minimum 800mb to 1GB is recommended if the server have to take care of
few processes and background activities.
·
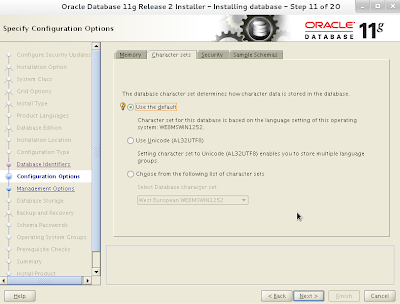
Choose the character set for storing data in the database
·
Click on the security settings so that all the required security
settings will be installed
·
If sample schemas like Scott, HR etc. are required please tick the
checkbox Create database with Sample
Schemas
·
Click Next button to continue
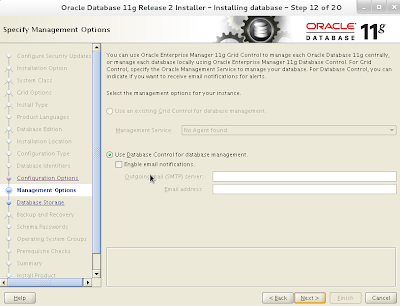
Ø If Enterprise Manager Grid
Control is configured already, it can be used to manage an instance. So click
on Use an existing Grid Control if already a grid control is configured and
select the Management service.
Ø If SMTP server is already
configured, it can be used to send notifications for database control. Select
option Use database Control for Database Management and check /tick the option
Enable Email notifications and provide the mail id if required.
·
Now enter the path where the database files has to be stored
Ø Click File System for
optimal database organization and performance.
Ø Click Automatic Storage
Management for simplifying administrative work as it will be taken care of by
Oracle Server itself.
·
Select the option for automated backups
Ø If automated backups are
required (in case of high volume ,critical data where business might need the
data all time for analysis purposes ) select this option
Ø Provide the path in case
if the option is File System, if the backup file path is managed by users.
Ø If the backup path should
be managed by oracle server, then choose Automatic Storage Management.
Ø Finally provide the
credentials for backup job which will be started by Operation System (which
will be created by installer)
Ø Otherwise click Do not
enable automated backups
·
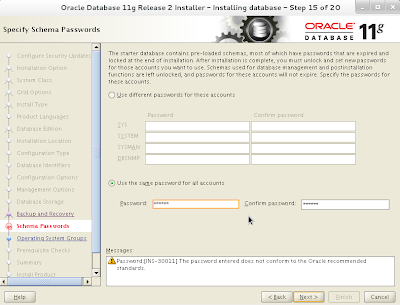
Provide the credentials for the default administrative users/schemas
and provide Oracle recommended passwords.
Ø Click yes to continue with
the password provided.
Ø Click No to change the
password.
·
Provide the DBA and USER Group and click Next to finish the database
software installation.
·
Once the installation is completed, save the response file if
required.
·
Click Finish
After Finish the installer will install the database software ,
configure a listener , configure a database ,
configure enterprise manager
which is explained in step Installation process.
Installation process :
·
After clicking Finish button the installer will install the database
(for both options Typical and Advanced Install)
.
·
The installer will configure a listener ( by initiating Net
Configuration Assistant ) first before configuring a database (by initiating
Database Configuration Assistant).
·
Now the installer will configure a database
·
Now final step in configuring a database is to unlock sample users /
schema and provide passwords for the default users / schema.
Ø Click Password Management
to unlock the users and provide password for the schema/ users.
Ø Click New password and
Confirm password and provide the passwords. (Don’t forget the passwords)
·
Now we need to run the root.sh for the path mentioned in the popup
window for making an entry of the
database SID and Database name in /etc/oratab file
·
Now the installer will configure an enterprise manager for the
database.


Comments
Post a Comment