Installing Oracle database software
Installing database 11G (Manual Configuration)
Version:
11.2.0
Operating
System:
Linux (Fedora 16)
Note:
This
installation procedure will do the following
·
install the oracle database software only .
·
configure and start a database done manually
·
configure and start a listener done manually
·
Start the enterprise manager done manually
Steps for installing the database is for the following options
Ø Database installation will
be done only in single node and not in Real Application clusters.
Ø Steps for installing
Enterprise Edition database will be shown
Ø Steps for installing
General type or Transaction processing will be shown
Steps to
install database software (manual
configuration of database and listener)
1.
Type command ./runInstaller
from the terminal under the database
folder
2.
The installer will be checking for the system requirements
3.
Next step is to provide an option to get security updates from Oracle
using your OTN credentials.
i.
Check the option if updates are required.
ii.
Uncheck the security updates check box if no updates required from Oracle
4.
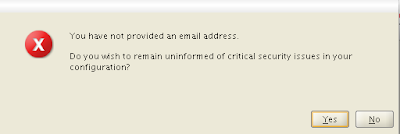
Confirm to proceed with the next step by clicking Yes.
5.
Next step is to select the way you need to install and configure the
database
·
Create and configure a
database
(if you want to create and configure database by installer itself)
·
Install database software
only (if
you want to install only the software and configure database later)
·
Upgrade an existing
database
(if you want to upgrade already existing lower version database )
Now we are going to choose install database software only as we are going
to configure database later.
6.
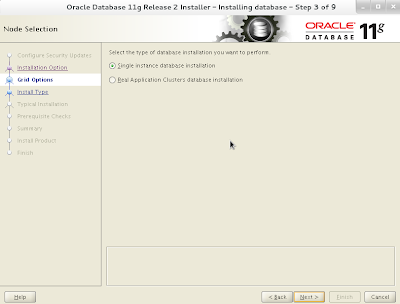
Select the type of database installation
·
Single instance database
installation
(for installing in one server)
·
Real Application Clusters
database installation (for installing in clusters)
Here we are going to see about single instance database installation
7.
Select the language
8.
Now select the database edition
to be installed
·
Enterprise Edition (For large companies
which require features like scalability, performance etc. as the volume of data is huge)
·
Standard Edition or
Standard Edition one (For small companies, medium sized companies, departments etc. where
volume of data will be less compared to the previous one )
9.
Choose the path for Oracle base and installation directory . Since we
have already created a base directory in bash_profile the installer will pick
the base directory (E.g. Here we have /u01/app/oracle)
The software location will
be created if there is none.
10. Choose the path for oracle
inventory
By default it will try to
take the parent directory of the oracle base (Eg:/u01/app/oracle is the base
directory so it will take /u01/app/ and
create oraInventory folder ) . If the folder oraInventory is not present the
installer will create one.
Since the inventory directory
is owned by oinstall group by default and we have already created it by default
installer choose the oinstall group.
11. Now select the
administrator and operator group (In our case dba group will be the admin group
and root will be the operator group)
12. Now the installer will
check for minimum installation and configuration requirements.
13. Now all the details till
now we have provided will be shown as summary .If needed you can save it as
response file.
It would be better if we
have saved the details since it contain details of the installation location
,group etc.
14. Click on Finish to install
the software or press back to change any settings .
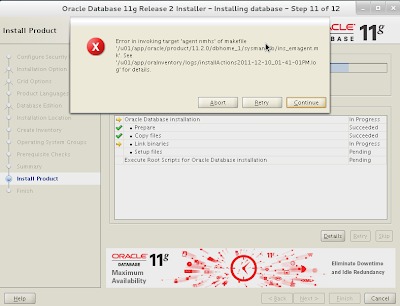
15. While installing the
software we could get the following error
Error in invoking target 'agent
nmhs' of makefile
Now for this don’t close
the installer but open a terminal window and follow the below steps
Please follow the steps to
solve the problem:
Open terminal window
Command :
cd /u01/app/oracle/product/11.2.0/dbhome_1/sysman/lib
or
cd $ORACLE_HOME/sysman/lib
ls ins_emagent.mk
vi ins_emagent.mk
Search for the line
$(MK_EMAGENT_NMECTL)
Change it to:
$(MK_EMAGENT_NMECTL) -lnnz11
Save the file.
Now click retry button
from the installer popup.
16. At the end of installation
there will be a popup which will show you the path for running two scripts
·
orainstRoot.sh under
/u01/app/oraInventory
·
root.sh under
/u01/app/oracle/product/11.2.0/dbhome_1
Before pressing OK button
,open terminal and execute the scripts as root user.
Command : su
<root password>
Ø cd /u01/app/oraInventory
Ø ./orainstRoot.sh
Ø cd /u01/app/oracle/product/11.2.0/dbhome_1
Ø ./root.sh
17. After the scripts got
executed successfully , click OK from installer.
Now the oracle database
software installation is done. We need to configure the database.


Comments
Post a Comment